Spooky Ghost Brown Butter Pumpkin Cookies: A Fall Delight
As the leaves turn and the air grows crisp, it’s time to embrace the spooky season with recipes that delight and surprise. One such recipe is the Spooky Ghost Brown Butter Pumpkin Cookies. These festive treats combine the rich flavors of pumpkin, the nuttiness of brown butter, and the sweetness of white and black candy melts. They not only taste fantastic but also double as whimsical decorations for Halloween gatherings or fall festivities. Below, we’ll provide an in-depth guide on how to create these delicious cookies, along with insights into the benefits of this craft, tips for success, storage instructions, and much more.
Ingredients
To whip up a batch of Spooky Ghost Brown Butter Pumpkin Cookies, gather the following:
- 1 batch of Brown Butter and Maple Chewy Pumpkin Cookies (recipe can be sourced from Butternut Bakery)
- White chocolate (I recommend Ghirardelli melting wafers for a smooth finish)
- Black candy melts (for the ghostly features)
- Piping bag (for precise decorating)
- Medium cookie scoop (for uniform cookie sizes)
- Light colored baking pans (to ensure even baking)
Instructions
Follow these steps to create your Spooky Ghost Brown Butter Pumpkin Cookies:
Bake the Cookies: Begin by following the recipe for Brown Butter and Maple Chewy Pumpkin Cookies. Ensure they are baked to a soft, chewy perfection. Once they are done, allow them to cool completely on a wire rack.
Melt the White Chocolate: While the cookies are cooling, melt your white chocolate in a microwave-safe container. Heat it in short bursts of 15-20 seconds, stirring in between until smooth and fully melted.
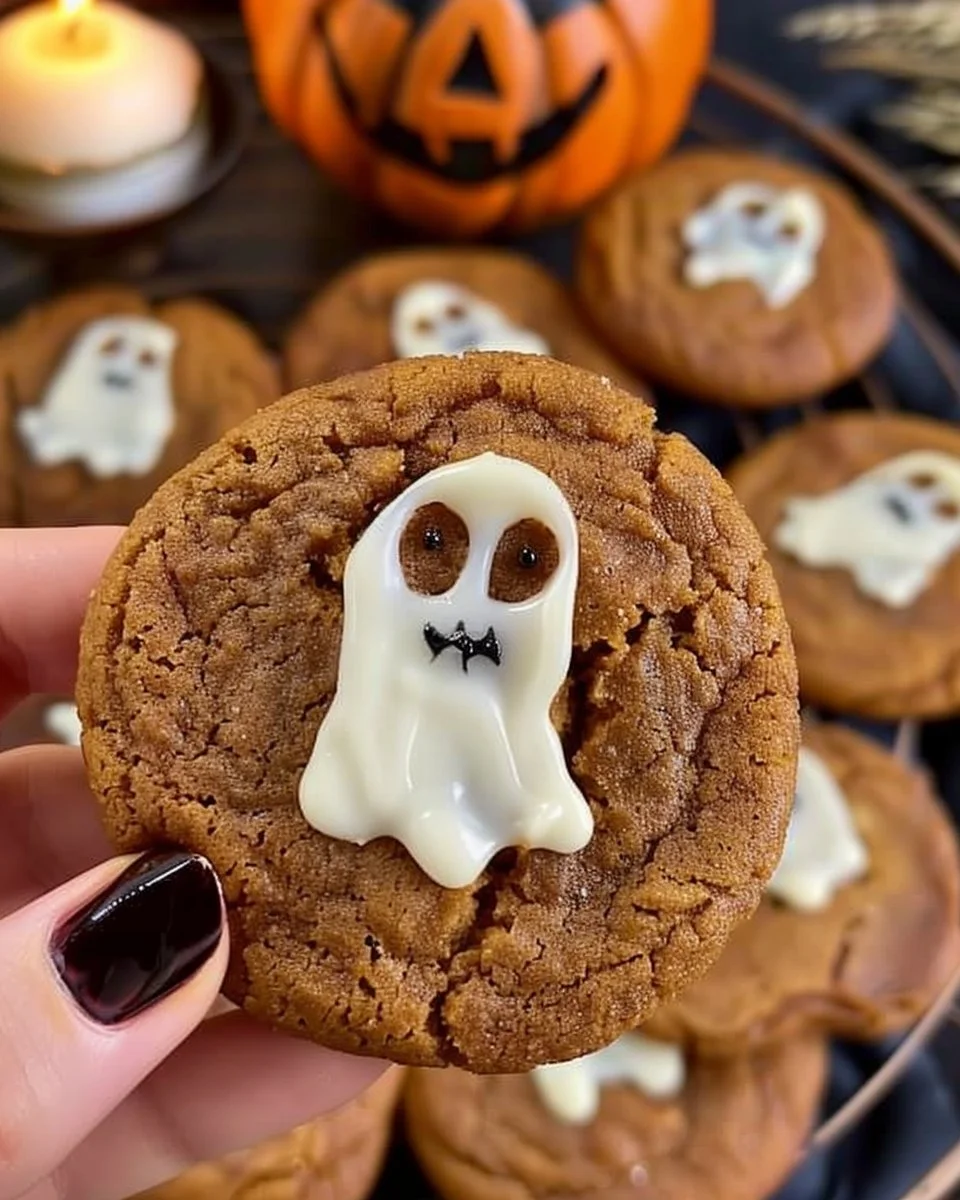
Create the Ghost Shape: Once the cookies are cool, spoon a small dollop of melted white chocolate onto the center of each cookie. Using the back of a small spoon, gently apply light pressure and drag it downwards to shape the chocolate into a ghost figure. This step may require some practice, so consider trying it on parchment paper before applying it to the actual cookies.
Allow to Harden: Let the white chocolate set and harden on the cookies. This usually takes about 15-30 minutes at room temperature.
Melt the Black Candy Melts: Next, melt your black candy melts using the same method as the white chocolate. Once melted, pour it into a piping bag or a ziplock bag with a small corner cut off.
Pipe the Features: Pipe small dots of the black candy melts onto the white chocolate ghosts to create eyes and a mouth. You can get creative with expressions, so don’t be afraid to have fun with it.
Let Everything Dry: Allow the candy melts to dry completely before handling the cookies. This ensures that your spooky decorations stay intact.
Enjoy: Once everything is dry, your ghostly cookies are ready for munching! Serve them at your Halloween party or enjoy them with a cozy cup of coffee.
Benefits of This Craft
Creating Spooky Ghost Brown Butter Pumpkin Cookies offers more than just a delicious treat. Here are some benefits:
Encourages Creativity: Decorating the cookies can be a fun, creative outlet, especially for kids and those who enjoy baking.
Perfect for Gatherings: These cookies make an excellent addition to any fall gathering, potluck, or Halloween party, adding to the festive atmosphere.
Seasonal Flavors: Pumpkin and warm spices are the essence of fall. This recipe allows you to enjoy these flavors while making a visually stunning treat.
Making Memories: Baking cookies is a great activity to do with family and friends, creating lasting memories during the holiday season.
Tips
To ensure your Spooky Ghost Brown Butter Pumpkin Cookies turn out perfectly, consider the following tips:
Use Quality Ingredients: The flavor of your cookies largely depends on the quality of the ingredients used. Opt for high-quality brown butter and chocolate for the best results.
Practice the Technique: If you’re new to piping, practice on parchment paper first. This will help you get comfortable with the pressure needed to create clear shapes and features.
Don’t Rush: Allow the cookies to cool completely before decorating to prevent the chocolate from melting and losing its shape.
Experiment with Designs: Feel free to explore different ghost expressions or even add colorful sprinkles for an extra festive touch.
What Do They Taste Like?
The Spooky Ghost Brown Butter Pumpkin Cookies are a delightful combination of flavors and textures. The pumpkin cookies are soft and chewy, with a buttery richness heightened by the brown butter, which adds a nutty flavor to each bite. The melted white chocolate provides a sweet and creamy contrast, while the black candy melts add a touch of sweetness and a whimsical presentation. Together, these elements create a unique treat that encapsulates the essence of fall and Halloween.
How to Store
Storing your Spooky Ghost Brown Butter Pumpkin Cookies correctly will ensure they maintain their freshness:
Room Temperature: Store the cookies in an airtight container at room temperature. They can last for up to a week, although they are best enjoyed fresh.
Refrigeration: If you live in a warm climate, consider refrigerating the cookies to prevent melting of the chocolate decorations. However, let them come to room temperature before serving to restore their softness.
Freezing: You can freeze the cookies if you want to make them in advance. Place them in a single layer in an airtight container with parchment paper between each layer to prevent sticking. They can be frozen for up to three months.
Conclusion
The Spooky Ghost Brown Butter Pumpkin Cookies are a delightful addition to your fall baking repertoire, combining the warmth of pumpkin spice with the charm of Halloween. This recipe not only yields scrumptious cookies but also offers a fun, creative experience that can be shared with family and friends. Set aside some time to bake, decorate, and indulge in these delightful treats, and enjoy a taste of the season.
FAQ
Can I replace the pumpkin puree with another ingredient?
While pumpkin puree gives these cookies their flavor and texture, you could try substituting with applesauce for a different taste and texture, though the results may vary.
Can I use chocolate chips instead of white chocolate?
Yes! If you prefer a chocolate flavor, using dark or milk chocolate chips in place of white chocolate can create a deliciously different cookie.
Are these cookies good for people with dietary restrictions?
This recipe includes wheat and dairy. For gluten-free options, use gluten-free flour, and for dairy-free, consider using suitable chocolate alternatives.
How can I make the cookies healthier?
You can experiment by reducing the sugar, using whole grain flour, or adding nuts or dried fruit for added nutrition.
Can I decorate the cookies differently?
Absolutely! Get creative with your toppings and decorations. Use different candy melts, edible glitter, or even frosting to enhance the spooky effect.

Spooky Ghost Brown Butter Pumpkin Cookies
- Prep Time: 30 minutes
- Cook Time: 15 minutes
- Total Time: 45 minutes
- Yield: 24 cookies
- Category: Dessert
- Method: Baking
- Cuisine: American
- Diet: Vegetarian
Description
Delightfully soft and chewy pumpkin cookies decorated with ghostly white chocolate and black candy melts, perfect for Halloween gatherings.
Ingredients
- 1 batch of Brown Butter and Maple Chewy Pumpkin Cookies
- White chocolate melting wafers
- Black candy melts
- Piping bag
- Medium cookie scoop
- Light colored baking pans
Instructions
- Bake the cookies according to the Brown Butter and Maple Chewy Pumpkin Cookies recipe and let them cool completely on a wire rack.
- Melt the white chocolate in a microwave-safe container, heating in short bursts until smooth and fully melted.
- Spoon a small dollop of melted white chocolate onto the center of each cookie and shape it into a ghost.
- Allow the white chocolate to set and harden on the cookies, about 15-30 minutes.
- Melt the black candy melts and pour into a piping bag.
- Pipe small dots of the black candy melts onto the white chocolate to create ghostly features.
- Let the decorated cookies dry completely before serving.
- Enjoy your spooky ghost cookies at Halloween festivities!
Notes
Store uneaten cookies in an airtight container at room temperature for up to a week. Refrigerate if it’s warm to keep decorations intact.

