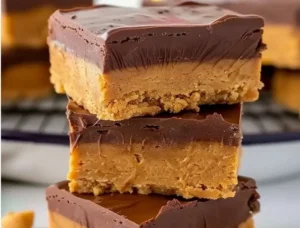
Who doesn’t love the sweet nostalgia of school lunches? The cafeteria treats, especially the peanut butter bars, took many of us back to simpler times. But what if I told you that you could enjoy those flavors again, even better than before? Enter the no-bake peanut butter bars! These delightful treats are not just a trip down memory lane; they are also easy to make and an absolute crowd-pleaser. Whether you are making them for a snack or a dessert, they cater to all tastes.
Why You Will Love This Recipe
No-bake peanut butter bars are rich and creamy, making them a delicious indulgence that feels indulgent yet is surprisingly simple to prepare. You won’t need any fancy gadgets or complicated techniques to whip these up. If you have kids, they will love helping you mix and layer these treats. Plus, they are perfect for any occasion, whether it’s a school event, a family gathering, or simply a night in watching movies.
The best part? These bars are gluten-free and can be made vegan with a few substitutes, ensuring everyone can enjoy them. With chocolate topping that shines with sweetness and the wonderful taste of peanut butter, who could resist?
How to Prepare No-Bake Peanut Butter Bars
Ingredients:
- 1 cup peanut butter (creamy or crunchy based on preference)
- 1 cup honey or maple syrup
- 2 cups rolled oats
- 1 cup chocolate chips (milk or dark chocolate)
- 1/2 cup powdered sugar (optional for extra sweetness)
- 1 teaspoon vanilla extract (optional)
Instructions:
- Prepare the Dish: Start by greasing a square baking dish (about 8×8 inches) or lining it with parchment paper. This step will help you remove the bars easily once they are set.
- Mix Peanut Butter and Sweetener: In a medium saucepan, combine the peanut butter and honey (or maple syrup). Heat over low heat, stirring constantly until everything is melted and well combined. This should take about 2-3 minutes.
- Combine the Dry Ingredients: In a large mixing bowl, add the rolled oats and powdered sugar (if using). Mix them together until evenly combined.
- Combine Wet and Dry Ingredients: Once the peanut butter and sweetener mixture is smooth, pour it over the oat mixture. Add the vanilla extract if using. Stir everything together until you get a sticky dough.
- Form the Bars: Transfer the mixture to the prepared baking dish. Use a spatula or your hands to press the mixture evenly into the dish. Make sure it is firmly packed.
- Melt the Chocolate: In a microwave-safe bowl, melt the chocolate chips in 20-30 second intervals, stirring after each until smooth.
- Top the Bars: Pour the melted chocolate over the pressed peanut butter mixture. Use a spatula to spread the chocolate evenly.
- Chill: Place the dish in the refrigerator for at least 2 hours, or until the chocolate is set and the bars are firm.
- Slice and Serve: Once set, lift the bars out of the dish using the edges of the parchment. Cut into squares or rectangles to serve.
How to Serve No-Bake Peanut Butter Bars
No-bake peanut butter bars are perfect for any occasion. You can serve them as a snack, a dessert, or even a breakfast treat. Pair them with a glass of milk or a cup of coffee for a delightful afternoon pick-me-up. The bars can also make great gifts; wrap them in parchment paper and tie with a ribbon for a sweet homemade present.
You can also consider topping the bars with sliced bananas, berries, or a sprinkle of sea salt for added flavor and texture.
How to Store No-Bake Peanut Butter Bars
These delicious treats store quite well! To maintain their freshness, you should keep them in an airtight container. If you plan to eat them within a few days, they can be stored at room temperature; however, for extended freshness, keep them in the refrigerator.
If you want to save some for later, you can also freeze the bars. Simply wrap them tightly in plastic wrap and then place them in a freezer-safe bag. They can last in the freezer for up to three months. To enjoy, simply thaw in the refrigerator overnight before serving.
Tips for Preparing No-Bake Peanut Butter Bars
- Use Quality Ingredients: The taste of these bars greatly depends on the quality of your peanut butter and chocolate. Choose natural peanut butter without added sugars or oils, and get good quality chocolate for the best flavor.
- Mix Thoroughly: Make sure to mix the peanut butter and sweetener well until completely smooth, and combine the dry and wet ingredients thoroughly to ensure even distribution.
- Try Different Sweeteners: While honey and maple syrup are classic sweeteners for this recipe, feel free to experiment with agave syrup or brown rice syrup.
- Add Flavor Notes: You can amp up the flavor by adding a pinch of salt or a dash of cinnamon to the mixture.
- Customize Toppings: Get creative with toppings. You can add crushed nuts, sprinkles, or even drizzle caramel over the chocolate layer for a unique twist.
Variations
- Vegan Version: To make vegan peanut butter bars, simply use maple syrup instead of honey and opt for dairy-free chocolate chips.
- Nut-Free Version: Substitute peanut butter with sunflower seed butter or tahini for a nut-free alternative that still provides a creamy texture.
- Add-ins: Toss in mini marshmallows, dried fruit, or shredded coconut into the mixture before pressing it into the dish to add some extra texture and flavor.
Frequently Asked Questions
1. Can I substitute the peanut butter?
Yes! You can use any nut or seed butter. Just keep in mind that each will provide a different flavor profile.
2. How long do these bars last?
When stored properly in an airtight container, they last up to a week in the refrigerator and three months in the freezer.
3. Can I use instant oats instead of rolled oats?
While rolled oats provide the best texture, you can use instant oats if that’s what you have on hand. Just note that they may make the bars slightly more dense.
4. Is it necessary to refrigerate the bars?
Refrigerating the bars helps them set properly and preserves their freshness. If left at room temperature, they may become too soft, especially in warmer weather.
5. Can these bars be made gluten-free?
Yes! Simply make sure the oats you use are certified gluten-free, and you’ll have a delicious gluten-free treat.
Conclusion
With their rich, creamy texture and delightful chocolate layer, these no-bake peanut butter bars will take you back to your school days while satisfying your sweet tooth in the best way possible. This simple recipe is not only easy to make but also adaptable to suit your dietary preferences and tastes. Whether you enjoy them as an after-school snack or share them at a family gathering, they are sure to win over hearts and taste buds alike. So grab your ingredients and start making these delicious bars today!