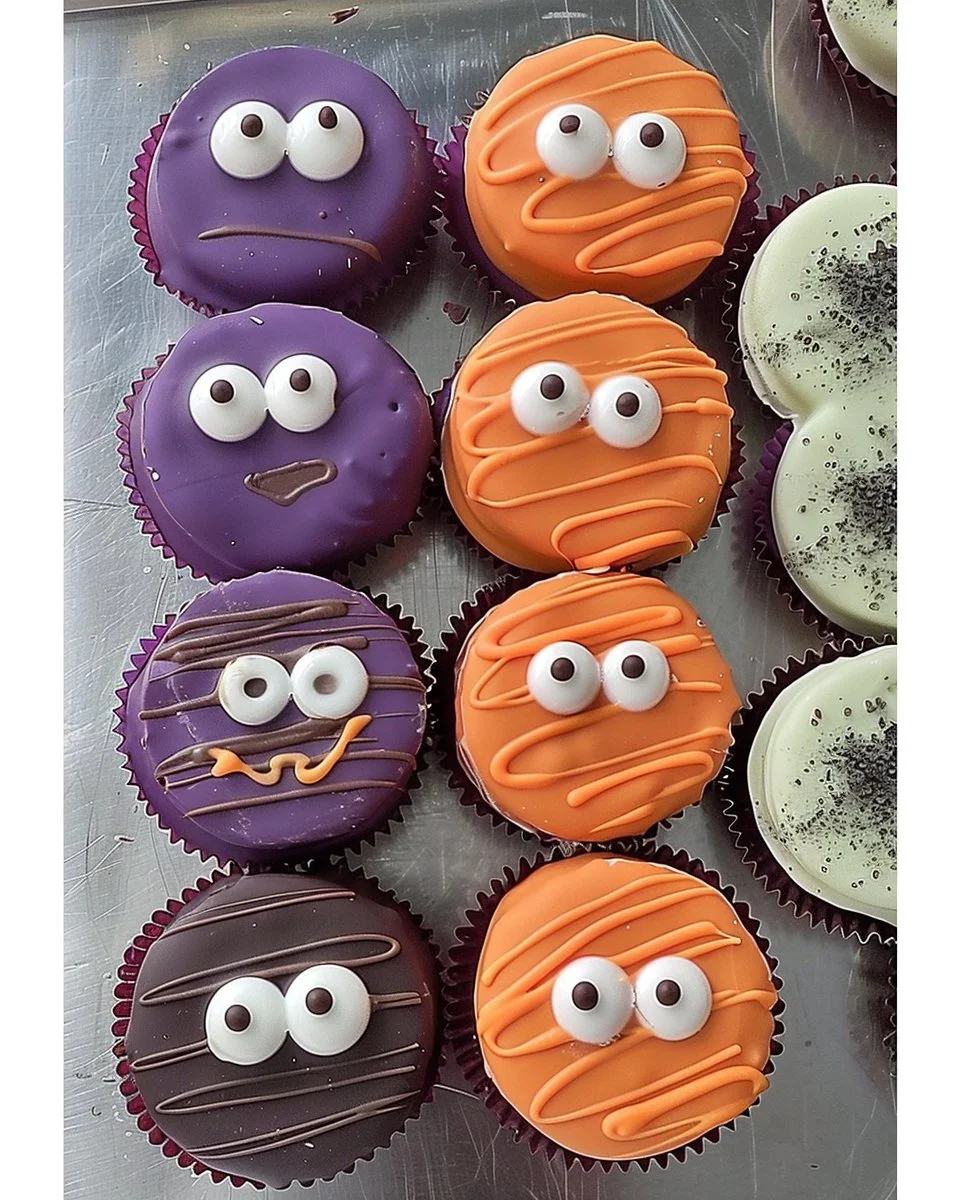
Crafting Delightful Halloween/Fall Chocolate Covered Oreos
As the leaves transform into vibrant hues of orange and gold, the air fills with the scent of cinnamon and pumpkin spice, signaling the arrival of autumn. One of the simplest and most delicious ways to celebrate this season is by making creepy and delightful Halloween or Fall-themed Chocolate Covered Oreos. This savory treat serves as both an eye-catching dessert and a fun project for families and friends, perfect for parties, gatherings, and as gifts.
Ingredients
To create these delectable treats, you will need:
- Oreo Cookies (original or double-stuffed based on personal preference)
- White Chocolate Chips or Melting Chocolate (for coating)
- Dark Chocolate Chips or Melting Chocolate (for drizzling and decoration)
- Fall-themed sprinkles (like pumpkins, ghosts, or autumn leaves)
- Food coloring (optional, to dye the white chocolate for added color)
- Lollipop sticks (optional, to turn them into pop-like treats)
With these simple ingredients, you’ll be on your way to creating an enchanting snack that everyone will adore.
Instructions
Creating Halloween/Fall Chocolate Covered Oreos is as delightful as the final product. Follow these steps:
Prepare Your Workspace: Start by gathering all your ingredients and tools. Line a baking sheet with parchment paper for easy cleanup.
Melt the Chocolate: In a microwave-safe bowl, melt the white chocolate chips according to package instructions, typically 30 seconds at a time until fully melted. If desired, add a few drops of food coloring to achieve a fall theme such as orange or brown. Repeat this step with dark chocolate if you’re using it.
Dip the Oreos: Using a fork, carefully dip each Oreo into the melted chocolate, ensuring it’s completely coated. Tap the fork against the side of the bowl to remove excess chocolate.
Place on Parchment: Transfer the dipped Oreo to the parchment-lined baking sheet. Repeat this process until all Oreos are coated.
Decorate: While the chocolate is still wet, sprinkle your fall-themed sprinkles generously on top of the Oreos. If you prefer a drizzled effect, wait until the chocolate has hardened slightly before drizzling dark chocolate on top using a piping bag or a fork.
Let Them Set: Allow the chocolate to fully harden at room temperature, which may take about 30 minutes. For a quicker process, you can place them in the refrigerator for about 10 minutes.
Serve and Enjoy: Once fully set, your Halloween/Fall Chocolate Covered Oreos are ready to enjoy! Arrange them on a decorative platter for presentation or package them in festive bags for gifts.
Benefits of This Craft
Crafting Halloween/Fall Chocolate Covered Oreos goes beyond satisfying your sweet tooth; it also offers numerous benefits:
Creativity: This project allows for personal expression! You can customize the colors, use different sprinkles, and even shape or decorate them according to your preferences.
Bonding Activity: Involving children or friends in the creation process fosters teamwork and enhances relationships. It’s a fun way to spend quality time together during the fall season.
Versatility: These chocolate-covered cookies are adaptable for various occasions, from Halloween parties to Thanksgiving gatherings, making them a staple treat during the fall.
Edible Gifts: Handmade treats make excellent gifts for neighbors, friends, and family during the holiday season, showcasing your thoughtfulness and effort.
Affordable Indulgence: Compared to purchasing fancy desserts, making these treats at home is an economical and satisfying option for satisfying that sweet craving.
Tips
To elevate your Chocolate Covered Oreos, consider these tips:
Experiment with Flavors: Mix white chocolate with flavored extracts such as peppermint, almond, or vanilla for a unique twist. You can also use flavored Oreos.
Enhance Texture: Add chopped nuts, coconut flakes, or toffee bits as toppings for added crunch.
Storage Tips: If you want to prepare ahead of time, be sure to store them properly. Avoid storing them in a warm location to prevent the chocolate from melting.
Presentation: Use decorative trays or cupcake holders when serving. Wrapping them individually in cellophane and tying with ribbon makes them perfect for gifts.
Get Creative with Shapes: Use cookie cutters to shape the chocolate-covered Oreos into various festive shapes, adding a fun spin on the typical round design.
What Does It Taste Like?
When you take a bite of a Halloween/Fall Chocolate Covered Oreo, you will experience a delightful contrast of textures and flavors. The crispness of the Oreo cookie pairs perfectly with the smooth, creamy chocolate coating that envelops it. Depending on the chocolate used, you might experience a sweet and mildly tangy taste. The added sprinkles contribute a crunch and a pop of sweetness, while any additional toppings will accentuate your flavor experience, allowing each bite to be a delightful surprise. This treat is not only visually appealing but also satisfies every sweet craving which makes it a must-have during the fall season.
How to Store
To keep your Chocolate Covered Oreos fresh and delicious, proper storage is essential. Here are some guidelines:
Room Temperature: Store the cookies at room temperature, away from direct sunlight and heat sources. Ideally, use an airtight container to maintain freshness.
Refrigeration: If you live in a warmer climate or want them to last longer, place the cookies in the refrigerator. Keep them in a container or a zip-lock bag to prevent them from absorbing moisture.
Freezing: For long-term storage, you can freeze your Chocolate Covered Oreos. Lay them in a single layer on a baking sheet until frozen and then transfer them to a freezer-safe bag. Ensure to separate layers with parchment paper. They can be stored this way for up to three months. Allow them to thaw at room temperature before serving.
Conclusion
Creating Halloween/Fall Chocolate Covered Oreos is a joyous and rewarding experience that captures the essence of the season. With minimal ingredients and easy steps, anyone can indulge in this fun and delicious craft. Not only do they make for a fantastic snack, but they also provide a stunning centerpiece for any autumn gathering or festive celebration. By employing the tips and ideas shared in this article, you can elevate your baking skills while embracing the spirit of fall festivities. So gather your loved ones, unleash your creativity, and have a memorable time making these enchanting treats!
FAQs
Q: Can I use other types of cookies instead of Oreos?
A: Absolutely! While Oreos are classic choices, any cookies you enjoy can be coated with chocolate, such as chocolate chip or peanut butter cookies.
Q: How long do Chocolate Covered Oreos last?
A: When stored properly at room temperature, they can last for up to two weeks. Refrigerated or frozen versions may extend shelf life.
Q: Can children help with this recipe?
A: Yes! This is a great family activity. Just ensure there’s supervision while melting chocolate to avoid burns.
Q: What other toppings can I use besides sprinkles?
A: You can use crushed candies, nuts, coconut, or even edible glitter for a festive touch.
Q: Is it possible to make these treats dairy-free?
A: Definitely! Just look for dairy-free chocolate alternatives to customize the recipe according to dietary restrictions.

Halloween/Fall Chocolate Covered Oreos
- Prep Time: 15 minutes
- Cook Time: 30 minutes
- Total Time: 45 minutes
- Yield: 12 servings
- Category: Dessert
- Method: No-Bake
- Cuisine: American
- Diet: Vegetarian
Description
Delightful and easy-to-make Chocolate Covered Oreos perfect for Halloween and Fall festivities.
Ingredients
- Oreo Cookies (original or double-stuffed)
- White Chocolate Chips or Melting Chocolate
- Dark Chocolate Chips or Melting Chocolate
- Fall-themed sprinkles (e.g., pumpkins, ghosts, autumn leaves)
- Food coloring (optional)
- Lollipop sticks (optional)
Instructions
- Prepare your workspace by lining a baking sheet with parchment paper.
- Melt the white chocolate chips in a microwave-safe bowl, adding food coloring if desired.
- Dip each Oreo in the melted chocolate, ensuring it’s fully coated.
- Transfer the dipped Oreos to the parchment paper.
- While the chocolate is wet, sprinkle with fall-themed sprinkles or drizzle with dark chocolate.
- Allow the chocolate to harden at room temperature for about 30 minutes or in the refrigerator for 10 minutes.
- Once set, serve and enjoy!
Notes
Customize the colors and sprinkles to match your Halloween or Fall theme. These make great edible gifts!

