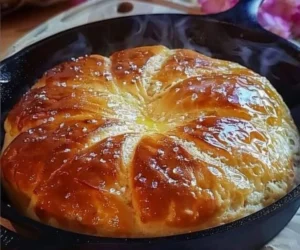
Bread is one of those timeless staples that brings warmth and comfort to our homes. The aroma of fresh bread filling the kitchen is a memory many of us treasure from our childhood. If you think that making bread means you need an oven, think again! This No-Oven Stovetop Bread is a game changer. It’s easy to make, soft, fluffy, and perfect for any meal. Whether you want to enjoy it with soup, use it for sandwiches, or just eat it with butter, this bread is sure to satisfy your cravings.
Why You Will Love This Recipe
There are many reasons to love this No-Oven Stovetop Bread. First, it is incredibly simple to make. You do not need to be an expert baker to achieve great results. The stovetop cooking method makes it accessible for everyone. You can whip it up quickly, making it perfect for any day of the week.
Second, the texture of this bread is soft and fluffy, reminiscent of the homemade bread Grandma used to make. The taste is delightful and pairs well with many dishes. Plus, the best part is that you can make it without heating up your entire kitchen with an oven.
Lastly, you can customize this bread with simple ingredients you likely already have in your pantry. It opens up a world of possibilities for variations. Plus, who doesn’t love the idea of fresh bread on the table in no time?
How to Prepare No-Oven Stovetop Bread
Now, let’s get into the details of how you can prepare this amazing No-Oven Stovetop Bread.
Ingredients:
- 2 cups all-purpose flour
- 1 tablespoon baking powder
- 1 teaspoon salt
- 1 tablespoon sugar (optional)
- 1 cup milk (you can use any kind—dairy, almond, oat, etc.)
- 2 tablespoons butter, melted (plus extra for greasing)
Instructions:
- Mix the Dry Ingredients: In a large mixing bowl, combine the flour, baking powder, salt, and sugar (if using). Mix them together until evenly incorporated.
- Add the Wet Ingredients: Pour in the milk and melted butter. Stir everything together with a wooden spoon or a spatula until a soft dough forms. Do not overmix; it’s okay if there are a few lumps.
- Knead the Dough: Lightly flour your work surface. Turn the dough out onto it and knead gently for about 2-3 minutes until it becomes smooth.
- Shape the Dough: Form the dough into a round shape that’s about 1 inch thick.
- Prepare Your Skillet: Heat a non-stick skillet over low to medium heat. Grease it lightly with butter.
- Cook the Bread: Carefully place the dough into the skillet. Cover with a lid and cook for about 20-25 minutes. Check the bread halfway through and reduce the heat if it’s browning too quickly.
- Flip the Bread: After 20-25 minutes, carefully flip the bread over using a spatula. Cover the skillet again and cook for another 10-15 minutes until the bread is cooked through.
- Check for Doneness: To check if the bread is done, insert a toothpick in the middle; it should come out clean.
- Cool and Slice: Remove the bread from the skillet and let it cool on a wire rack for a few minutes before slicing. Enjoy it warm!
How to Serve No-Oven Stovetop Bread
This No-Oven Stovetop Bread is versatile and can be served in numerous ways. Here are a few ideas:
- With Butter: The simplest and most comforting way to enjoy this bread is with a spread of butter. The warmth of the bread will melt the butter perfectly.
- With Soups or Stews: Slice this bread and serve it alongside your favorite soup or stew. It’s perfect for dunking!
- As Sandwiches: Use this bread to make delicious sandwiches. Fill it with your favorite ingredients like turkey, lettuce, and mayo for a tasty lunch.
- With Jam or Honey: For a sweet treat, spread some jam or honey over a slice of warm bread.
- Toast for Breakfast: Toast a slice of the bread in a skillet with a little butter for a lovely breakfast treat.
How to Store No-Oven Stovetop Bread
Storing your stovetop bread properly is essential to keep it fresh. Here are helpful tips:
- Short-term Storage: If you plan to eat the bread within a couple of days, wrap it in plastic wrap or place it in an airtight container at room temperature.
- Long-term Storage: For longer storage, slice the bread and place it in a zip-top freezer bag. It can be frozen for up to 3 months. Just thaw it at room temperature when you’re ready to enjoy it again.
Tips for Preparing No-Oven Stovetop Bread
- Don’t Overmix: When combining the wet and dry ingredients, mix just until combined. Overmixing can lead to tough bread.
- Adjust the Heat: Cook the bread on low to medium heat. High heat can cause the outside to burn while the inside remains raw.
- Experiment with Flavors: Feel free to add herbs, cheese, or spices to the dough for a unique twist. Garlic powder, oregano, or cheddar cheese work remarkably well!
- Use a Lid: Always cover the skillet while cooking. This helps to create steam and cooks the bread evenly.
- Use a Non-Stick Skillet: This helps prevent the bread from sticking. If you don’t have a non-stick skillet, be sure to grease it well.
Variations
While this basic recipe is delicious on its own, here are some fun variations you can try:
- Herb Bread: Add a tablespoon of dried herbs like rosemary or thyme to the dough for a fragrant bread.
- Garlic Bread: Mix in minced garlic or garlic powder for a delicious garlicky flavor.
- Cheesy Bread: Fold in shredded cheese such as cheddar or mozzarella for a cheesy twist.
- Whole Wheat Bread: Substitute half of the all-purpose flour with whole wheat flour for a healthier option.
Frequently Asked Questions
1. Can I use self-rising flour instead of all-purpose flour?
Yes, you can use self-rising flour. Just omit the baking powder and salt since self-rising flour already has them included.
2. What if I don’t have milk?
You can substitute with water or any non-dairy milk alternative such as almond milk, soy milk, or oat milk.
3. How can I tell if the bread is done?
You can check doneness by inserting a toothpick or a skewer into the center of the bread. If it comes out clean, the bread is ready!
4. Can I make this bread gluten-free?
Yes! Use a gluten-free flour blend that can be substituted for all-purpose flour, adjusting the liquid as necessary.
5. Can I double the recipe?
You can double the recipe, but you may need to cook the bread in batches, depending on the size of your skillet.
This No-Oven Stovetop Bread is a delightful addition to your cooking repertoire. It’s easy, quick, and customizable to your taste. You’ll enjoy the process and the delicious results that will remind you of home. Gather your ingredients and start making this lovely bread today!