Why Make This Recipe
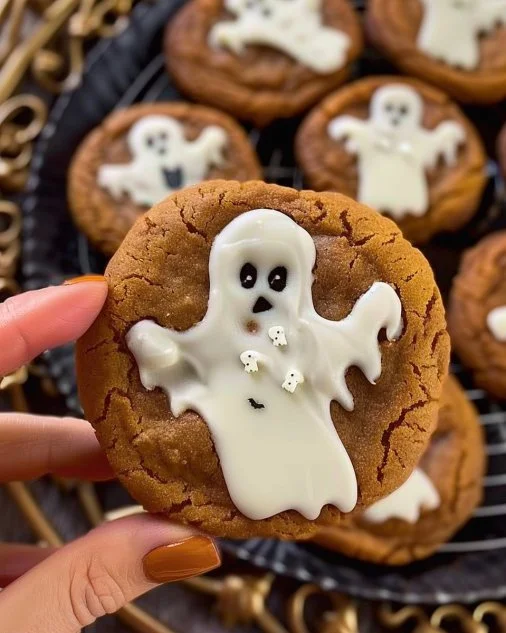
Spooky Ghost Brown Butter Pumpkin Cookies are perfect for autumn. They blend the warm flavors of pumpkin and brown butter with a fun Halloween twist. These cookies not only taste amazing but also look adorable with their ghostly decorations. They are great for Halloween parties, family get-togethers, or just to enjoy at home with loved ones.
How to Make Spooky Ghost Brown Butter Pumpkin Cookies
Ingredients:
- 1 batch Brown Butter and Maple Chewy Pumpkin Cookies by Butternut Bakery
- White chocolate
- Black candy melts
- Piping bag
- Medium cookie scoop
- Light colored baking pans
Directions:
- Bake the pumpkin cookies according to the recipe and allow them to fully cool.
- Melt your white chocolate of choice (I use Ghirardelli melting wafers).
- Spoon a small dollop of white chocolate onto a fully cooled cookie.
- Using the back of a small spoon, apply light pressure and slowly drag the spoon down to create the ghost shape. You can practice on parchment paper before working with the actual cookies.
- Allow the white chocolate to harden.
- Next, melt the black candy melts in a microwave-safe container. Pour them into a piping bag (this is sturdier) or a ziplock bag and cut a small tip off the corner of the bag.
- Pipe small dots with the candy melts to make the eyes and mouth.
- Allow the candy melts to fully dry, and then enjoy your spooky treats!
How to Serve Spooky Ghost Brown Butter Pumpkin Cookies
These cookies are fun to serve at Halloween parties or as a seasonal treat. You can arrange them on a festive platter or place them in clear bags tied with orange or black ribbon for a cute gift. Pair them with hot apple cider or a warm cup of cocoa for a delightful autumn snack.
How to Store Spooky Ghost Brown Butter Pumpkin Cookies
Store your cookies in an airtight container at room temperature. They will stay fresh for up to a week. If you want to keep them longer, you can freeze them. Just make sure to separate layers with parchment paper and place them in a freezer-friendly bag or container.
Tips to Make Spooky Ghost Brown Butter Pumpkin Cookies
- Make sure your cookies are completely cool before decorating to prevent the chocolate from melting.
- If the white chocolate is too thick, you can add a tiny bit of coconut oil to help it flow better.
- Experiment with the size of the ghost for different looks – some can be larger or smaller!
- Use different colors of candy melts for different holiday themes.
Variation
You can also add spices, like cinnamon or nutmeg, to the cookie dough for extra flavor. If you want a chocolatey twist, consider using dark chocolate instead of white!
FAQs
Q: Can I use regular butter instead of brown butter?
A: Yes, while brown butter adds a nutty flavor, you can use regular butter if you prefer.
Q: What if I don’t have candy melts?
A: You can use chocolate chips instead, but they may not set as easily for decorating.
Q: Can I make the cookie batter in advance?
A: Absolutely! You can prepare the dough a day before and chill it in the fridge until you’re ready to bake.

Spooky Ghost Brown Butter Pumpkin Cookies
- Prep Time: 15 minutes
- Cook Time: 30 minutes
- Total Time: 45 minutes
- Yield: 24 cookies
- Category: Dessert
- Method: Baking
- Cuisine: American
- Diet: Vegetarian
Description
Adorable cookies blending pumpkin and brown butter with a fun Halloween twist, perfect for parties and seasonal treats.
Ingredients
- 1 batch Brown Butter and Maple Chewy Pumpkin Cookies
- White chocolate
- Black candy melts
- Piping bag
- Medium cookie scoop
- Light colored baking pans
Instructions
- Bake the pumpkin cookies according to the recipe and allow them to fully cool.
- Melt your white chocolate of choice (recommended: Ghirardelli melting wafers).
- Spoon a small dollop of white chocolate onto a fully cooled cookie and use the back of a small spoon to create the ghost shape.
- Allow the white chocolate to harden.
- Melt the black candy melts and pour them into a piping bag.
- Pipe small dots with the candy melts to make the eyes and mouth.
- Allow the candy melts to fully dry before serving.
Notes
Ensure cookies are completely cool before decorating to prevent the chocolate from melting. Use different colors of candy melts for various themes.

