Kid’s Halloween Charcuterie Board
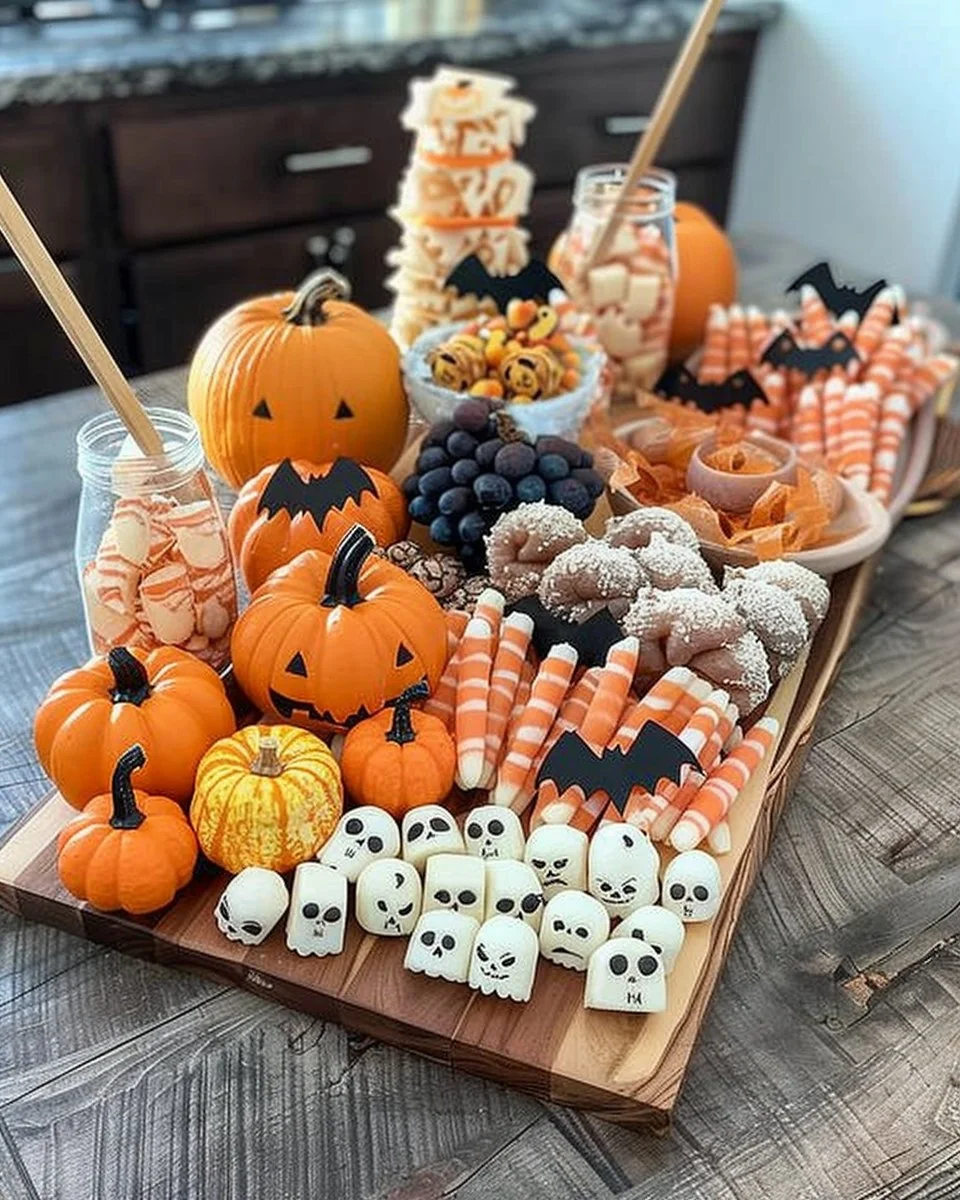
Halloween is a time for fun, creativity, and, of course, delicious treats. What better way to celebrate this festive occasion than by creating a Kid’s Halloween Charcuterie Board? This entertaining and visually appealing platter will not only impress your little ghouls and goblins, but it also provides a great way to encourage them to try new foods. This article will guide you through the details of creating an eye-catching charcuterie board that is perfect for Halloween, along with discussing its benefits, tips for assembly, storage methods, and flavors you can expect from the components.
Ingredients
To assemble your Kid’s Halloween Charcuterie Board, you will need the following key ingredients:
- Assorted cheeses (like cheddar, mozzarella, and gouda)
- Cured meats (such as salami and pepperoni)
- Fresh fruits (like grapes, strawberries, and apples)
- Vegetables (carrots, celery sticks, and cherry tomatoes)
- Crackers and breadsticks
- Dips (hummus and ranch dressing)
- Halloween-themed snacks (like gummy worms, candy corn, and chocolate spiders)
Each of these ingredients brings a different flavor and texture to the charcuterie board, making it a delightful and nutritious spread for Halloween festivities.
Instructions
Creating a Kid’s Halloween Charcuterie Board is incredibly straightforward. Follow these simple instructions to assemble your festive platter:
- Start by selecting a large, flat surface or a decorative board to serve as the foundation for your charcuterie.
- Begin by arranging the assorted cheeses in one corner of the board. Cut them into fun Halloween-themed shapes using cookie cutters for added visual appeal.
- Next, position the cured meats alongside the cheese. Consider rolling the slices of salami and pepperoni to create a fun visual effect.
- Take the fresh fruits and wash them thoroughly. Make sure to slice the apples and strawberries into bite-sized pieces. Scatter the fruits around the board, creating vibrant pops of color.
- Prepare the vegetables by washing and cutting them into appropriate sizes. Place the carrots, celery sticks, and cherry tomatoes in small sections to add crunch to the board.
- Add the crackers and breadsticks in varied clusters across the board. These will offer a helpful contrast to the creaminess of the cheeses and dips.
- Finally, incorporate dips like hummus and ranch dressing in small bowls, placing them strategically on the board to invite guests to indulge.
- To enhance the Halloween theme, sprinkle in candy corn, gummy worms, and chocolate spiders throughout the board. These fun additions will make the spread more whimsical and engaging for children.
Benefits of This Craft
Creating a Kid’s Halloween Charcuterie Board has numerous benefits. First, it promotes healthy eating habits by introducing children to a variety of foods, including fruits, vegetables, and lean proteins. It encourages children to explore different textures and flavors, enhancing their palate and willingness to try new things.
Moreover, assembling the board can be a fun and interactive family activity. Kids can help with selecting ingredients, arranging food, and, of course, tasting. This collaborative approach cultivates a sense of pride and accomplishment in children, building their confidence in both cooking and presentation skills.
Additionally, this charcuterie board can be easily customized based on dietary restrictions and personal preferences. Whether you’re accommodating vegetarians, gluten-free eaters, or nut allergies, you can tailor the board to meet various needs while still delivering a visually appealing and appetizing selection.
Tips
To make your Kid’s Halloween Charcuterie Board even more enjoyable, consider the following tips:
Theme it Up: Use Halloween-themed cookie cutters for cheeses, fruits, and vegetables. Shapes like pumpkins, bats, and ghosts can elevate the festive spirit of the board.
Vary the Textures: Incorporate a mix of soft, crisp, and chewy items. Creamy cheeses paired with crunchy crackers and juicy fruits create a balanced and satisfying experience for both kids and adults.
Color Coordination: Use colors to your advantage. Halloween is filled with vibrant colors like oranges, blacks, and purples. Choose ingredients that reflect this color palette for a more attractive presentation.
Engage Kids in the Process: Allow children to help with the assembly. Let them choose which ingredients go where; this will make them more excited to eat what they helped create.
Add Labels: Small, fun labels identifying each item can intrigue young eaters and spark their curiosity about new flavors.
What Taste Look Like?
The taste experience of this Kid’s Halloween Charcuterie Board is a delightful medley of flavors. The assorted cheeses provide a creamy richness that pairs wonderfully with the salty cured meats. Fresh fruits, like grapes and strawberries, introduce a sweet and juicy contrast, while crunchy vegetables like carrots and celery contribute lightness and freshness.
The crackers and breadsticks offer a satisfying crunch, balancing the creaminess of the dips, which add another layer of flavor. The Halloween-themed treats, such as gummy worms and candy corn, add a whimsical sweetness that ties the whole board together. Overall, expect a balanced and vibrant array of tastes that will cater to children’s palates.
How to Store
If you find yourself with leftovers after the festivities, storing your Kid’s Halloween Charcuterie Board correctly is essential. To keep the ingredients fresh, follow these steps:
Separate Perishables: Pack perishable items such as cheeses, cured meats, fruits, and vegetables individually in airtight containers.
Wrap Carefully: If you have leftover dips, make sure to cover them tightly with plastic wrap or transfer them to smaller containers with lids.
Refrigerate Promptly: All these items should be refrigerated within two hours after their initial display. Keeping food at the appropriate temperature is crucial for food safety, especially with perishables.
Consume Quickly: While you can store the leftovers for up to three days, for optimal taste and quality, aim to consume them within the first day or two.
Conclusion
A Kid’s Halloween Charcuterie Board is a fun, engaging, and delicious way to celebrate the holiday. With a variety of tastes, textures, and vibrant colors, this board will surely impress both children and adults alike. Not only does it encourage healthy eating, but it also offers a playful experience, making it an excellent addition to any Halloween gathering. So gather your ingredients, invite your little ones to help, and have a spooky good time assembling and enjoying this delightful creation.
FAQ
1. Can I make this board ahead of time?
Yes, you can prepare all the ingredients ahead of time and assemble the board just before serving to maintain freshness.
2. What if my child has dietary restrictions?
You can easily modify the board to suit dietary needs by choosing alternative ingredients such as plant-based cheeses, gluten-free crackers, or nut-free snacks.
3. How can I keep the fruits from browning?
To prevent apples from browning, toss them in a mixture of lemon juice and water before arranging them on the board.
4. Can I use sweets other than the ones listed?
Absolutely! Feel free to customize the sweets according to your child’s preferences, using Halloween-themed candies that they enjoy.
5. What should I do with leftovers?
Pack them in airtight containers and refrigerate for up to three days. Make sure to consume them promptly for the best quality!
Print
Kid’s Halloween Charcuterie Board
- Prep Time: 15 minutes
- Cook Time: 0 minutes
- Total Time: 15 minutes
- Yield: 6 servings
- Category: Appetizer
- Method: Assembling
- Cuisine: American
- Diet: Vegetarian
Description
A festive charcuterie board filled with assorted treats perfect for Halloween, encouraging kids to try new foods.
Ingredients
- Assorted cheeses (cheddar, mozzarella, gouda)
- Cured meats (salami, pepperoni)
- Fresh fruits (grapes, strawberries, apples)
- Vegetables (carrots, celery sticks, cherry tomatoes)
- Crackers and breadsticks
- Dips (hummus, ranch dressing)
- Halloween-themed snacks (gummy worms, candy corn, chocolate spiders)
Instructions
- Select a large, flat surface or decorative board.
- Arrange assorted cheeses in one corner, cutting them into fun Halloween shapes.
- Position the cured meats next to the cheese, rolling the slices for visual effect.
- Wash and slice fresh fruits, scattering them around the board.
- Prepare and arrange the vegetables in small sections for crunch.
- Add crackers and breadsticks in varied clusters.
- Incorporate dips in small bowls on the board.
- Sprinkle in the Halloween-themed snacks throughout the board.
Notes
Engage kids in the assembly process to enhance their excitement about the food.

