Kid’s Halloween Charcuterie Board: A Spooktacular Delight
Halloween is not just a time for costumes and trick-or-treating; it’s also a wonderful opportunity to unleash your creativity in the kitchen. One of the most exciting ways to celebrate the spooky season is by creating a Kid’s Halloween Charcuterie Board. This creative and festive presentation will be sure to delight both kids and adults alike, turning your Halloween gathering into a memorable feast. In this article, we will explore the ingredients to use, step-by-step instructions, the benefits of crafting this charcuterie board, tips for success, the taste and appearance of the dish, storage methods, and we’ll even address some frequently asked questions.
Ingredients
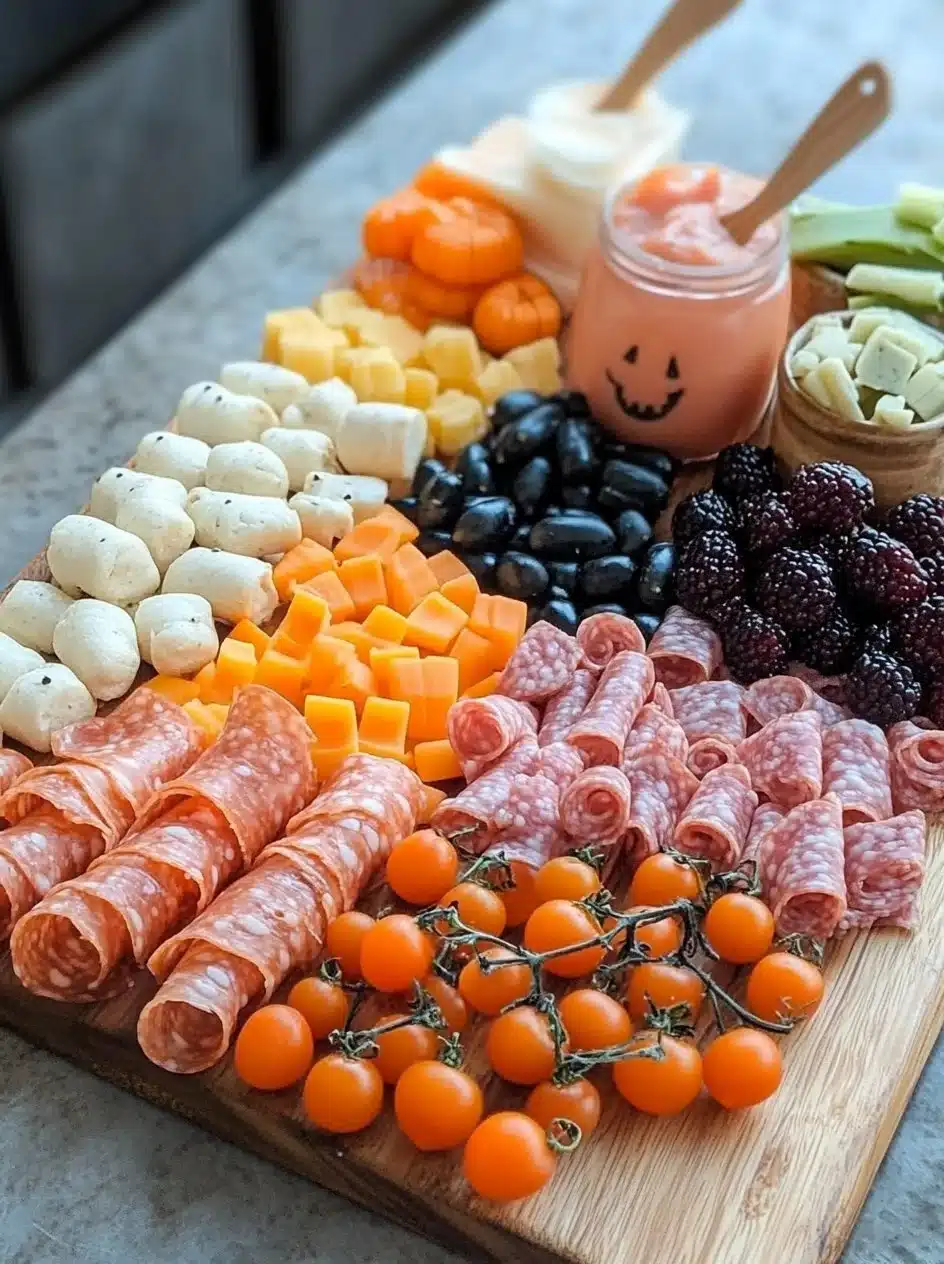
Creating a Halloween charcuterie board is all about variety and fun. Here’s a list of ingredients that will not only appeal to the eyes but also the taste buds:
- Assorted cheeses (cheddar, gouda, and mozzarella)
- Variety of cured meats (pepperoni, salami, and prosciutto)
- Crackers and breadsticks
- Seasonal fruits (grapes and apple slices)
- Veggies (carrots, cucumber, and bell peppers)
- Halloween-themed treats (gummy worms, candy corn, and chocolate treats)
- Dips (hummus and ranch dressing)
- Edible decorations (small pumpkins and ghost-shaped cheese slices)
These ingredients can easily be arranged on a large platter or board to create a stunning visual feast that captures the spirit of Halloween.
Instructions
Creating your Kid’s Halloween Charcuterie Board is simple and can be done in a few easily manageable steps. Here’s how you can assemble this festive platter:
Prepare Your Board: Start with a large, flat serving board or platter. Make sure it’s clean and dry before you start arranging the ingredients.
Arrange the Cheeses: Cut the cheeses into various shapes and sizes. Place them around the board in clusters or in a pattern that appeals to you. You might consider using cookie cutters to create Halloween shapes.
Add the Cured Meats: Next, arrange the cured meats on the board. You can roll them up or fold them attractively. Make sure they complement the cheese placements.
Incorporate Crackers and Breadsticks: Place an assortment of crackers and breadsticks throughout the board, filling gaps and creating visual interest.
Include Seasonal Fruits and Veggies: Add a burst of color by placing seasonal fruits like grapes and apple slices. Slice the veggies into fun shapes or sticks for easy snacking.
Add Halloween Treats: Scatter the Halloween-themed treats like gummy worms and candy corn amid the other items for a festive touch.
Include Dips: Place small bowls of dips like hummus and ranch dressing in corners of the board for easy access.
Final Touches: Finish off your charcuterie board by placing edible decorations such as small pumpkins or ghost-shaped cheese slices around the board to enhance its Halloween theme.
With these simple steps, you will create a colorful and exciting Kid’s Halloween Charcuterie Board that everyone will love.
Benefits of This Craft
Creating a Kid’s Halloween Charcuterie Board offers numerous benefits. First and foremost, it encourages creativity and allows kids to engage in the process of assembling their meals, making it more enjoyable and interactive. This craft also promotes healthy eating habits as it includes a variety of fruits and vegetables alongside treats.
Furthermore, the board can serve as a focal point at parties, drawing attendees together and sparking conversations. It can easily be customized according to dietary preferences or allergies, making it versatile for all occasions. A charcuterie board is also a fantastic way to teach children about different food textures and flavors while fostering their interest in cooking and nutrition.
Tips
For the best results, consider the following tips while creating your Kid’s Halloween Charcuterie Board:
Use Seasonal Colors: Opt for vibrant colors associated with Halloween, such as orange, black, and purple. This will enhance the visual appeal of the board.
Get Creative with Shapes: Use cookie cutters to create fun shapes from cheeses, fruits, and even sandwiches. This adds a playful touch that children will love.
Involve the Kids: Allow children to participate in the assembly of the board. This will not only make them more excited about the food but will also develop their fine motor skills.
Check for Allergies: Always consider any dietary restrictions or allergies of your guests. Offering a variety of options ensures everyone can enjoy the board safely.
Balance Sweet and Savory: Ensure that there’s a good balance between sweet and savory items so that there’s something for every taste preference.
What Does It Taste Like?
The Kid’s Halloween Charcuterie Board delivers a delightful blend of flavors. The creamy, rich nature of the assorted cheeses perfectly complements the spicy and savory notes of the cured meats. The crunch of the crackers and the fresh crispness of the veggies provide a satisfying contrast, while the sweetness of seasonal fruits adds a refreshing element.
The Halloween-themed treats bring excitement and nostalgia to the mix, offering a burst of sugary sweetness that contrasts beautifully with the savory items. Overall, this board is designed to satisfy a variety of taste buds, ensuring that every bite is filled with flavor and fun.
How to Store
If you find that you have leftovers after your Halloween gathering, proper storage is essential to maintain the freshness of your charcuterie board. Here are some storage tips:
Cover and Refrigerate: If the board has not been fully consumed, cover it tightly with plastic wrap or aluminum foil and store it in the refrigerator. Consume within 2-3 days for optimal freshness.
Store Ingredients Separately: If you anticipate leftovers, consider storing the ingredients separately. Place meats, cheeses, fruits, and veggies in airtight containers. This helps to maintain their individual flavors and textures.
Avoid Moisture: Ensure that the vegetables and fruits are dry before placing them on the board. Excess moisture can lead to spoilage and impact the flavor of the other ingredients.
Conclusion
Creating a Kid’s Halloween Charcuterie Board is an enjoyable and engaging way to celebrate the spooky season. With a mix of delightful flavors, colorful presentations, and interactive elements, it’s perfect for gatherings of all sizes. The process of assembling the board not only encourages creativity but also fosters healthier eating habits for children. With the right ingredients and a dash of Halloween spirit, you can craft a memorable feast that your guests will talk about long after the holiday has passed.
FAQ
1. Can I customize the ingredients based on dietary restrictions?
Absolutely! You can easily customize your charcuterie board by including options for vegetarians, vegans, or individuals with food allergies.
2. How far in advance can I prepare the board?
You can prepare elements of the board a day ahead, such as chopping veggies and arranging cheese. However, it’s best to assemble the board just a few hours before serving to ensure optimal freshness.
3. What if I don’t have a large board?
If you don’t have a large charcuterie board, fear not! You can use a baking tray, a large platter, or even several smaller boards.
4. Can I make this board for other holidays?
Certainly! Feel free to adapt this concept for other holidays or events by changing the colors, themes, and ingredients to fit the occasion.
Creating a Kid’s Halloween Charcuterie Board is not only a feast for the senses but also an experience that encourages creativity and fun in the kitchen. Embrace the spirit of Halloween and let your imagination run wild!
Print
Kid’s Halloween Charcuterie Board
- Prep Time: 15 minutes
- Cook Time: 0 minutes
- Total Time: 15 minutes
- Yield: 8 servings
- Category: Appetizer
- Method: No Cooking
- Cuisine: American
- Diet: Vegetarian
Description
A fun and colorful Halloween-themed charcuterie board filled with assorted cheeses, cured meats, seasonal fruits, and spooky treats.
Ingredients
- Assorted cheeses (cheddar, gouda, and mozzarella)
- Variety of cured meats (pepperoni, salami, and prosciutto)
- Crackers and breadsticks
- Seasonal fruits (grapes and apple slices)
- Veggies (carrots, cucumber, and bell peppers)
- Halloween-themed treats (gummy worms, candy corn, and chocolate treats)
- Dips (hummus and ranch dressing)
- Edible decorations (small pumpkins and ghost-shaped cheese slices)
Instructions
- Prepare Your Board: Start with a clean, large, flat serving board or platter.
- Arrange the Cheeses: Cut the cheeses into various shapes and arrange in clusters.
- Add the Cured Meats: Roll or fold the cured meats and place them on the board.
- Incorporate Crackers and Breadsticks: Fill gaps with an assortment of crackers and breadsticks.
- Include Seasonal Fruits and Veggies: Add grapes, apple slices, and fun-shaped veggie sticks.
- Add Halloween Treats: Scatter gummy worms, candy corn, and other treats around.
- Include Dips: Place small bowls of dips in corners for easy access.
- Final Touches: Add edible decorations to enhance the Halloween theme.
Notes
Use vibrant Halloween colors and creative shapes to enhance visual appeal.

